Parenting is a tool in Maya which allows the user to move an object with another object simultaneously. For this task, we were given a Maya file with Max and a ball. We then had to animate Max picking up the ball, using this parenting method. The object can be connected and disconnected anytime during the framing process.
I completed the task without any trouble so to make things more interesting, I created an animation which shows Max throwing a ball. To get the leg and arm poses right, I was recorded to act out the process, which helped me get a more realistic result.
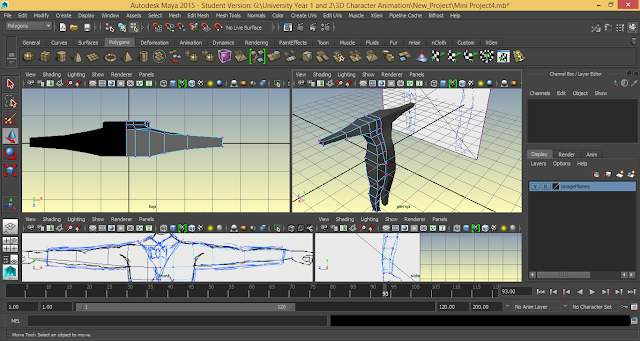
Parenting Test
Ball from Jack Vanes on Vimeo.
Video Reference
20170323_163904 from Jack Vanes on Vimeo.
Thursday, 30 March 2017
Monday, 27 March 2017
Green Screen Essentials
On Wednesday 22nd of March, I had a tutorial explaining the process of the green screen.
I learned that in order for the green screen to work, multiple lights, all in various places, need to be pointed at the green screen figure so that it lacks any unwanted shadows that will cause a mighty inconvenience when chroma-keying.
There was even a green light available for pointing at the green screen, so that also deflects any shadows. The disadvantage of this is that sometimes, the light could cast on the figure, giving it a green glow, which could cause a flaw in keylighting.
Since shadows are completely inevitable and thus cannot be completely eradicated, I could simply use adjustments in After Effects to remove the shadows. Though this could cause some color setbacks on the origami models.


Sunday, 26 March 2017
Background transition
Using the same method as before to create the first background, I have created another background. I have done this so that I could make a transition test. This involves the cutouts moving on and off screen. I think this will make the animation more lively. Each background will be different for each animal in the animation. Each of the eight animals will have 3-4 seconds of screen time before the background and the origami animals change.
I also need to zoom in on the screen so that it only shows the necessary parts as right now, the edges of the background are conspicuous, making it seem inappropriate for the screening.
Transition Test from Jack Vanes on Vimeo.
An Animated Future for 3D
This article explains the relevance for 3D animation and how it's being distributed as a commercial success. It also explains how 3D holds elements to the animation industry with its eye-catching features to amaze the audience. In addition, it explains the future that holds for 3D as it may become more enhanced at some point in time.
I find this article relevant to my work because 3D plays a part in this video. For the background, I use shapes made in 3DS Max and then textured them with decent lighting to give a photorealistic look.
Source: https://blog.animationstudies.org/?p=405
Rationale Plan
The rationale will be approximately 2000 words long. It will be justifying why I have chosen the story I did and essentially anything relevant to The Creative Matrix. I will be explaining why I have chosen certain aspects in the story and how each aspect in the story is relevant to include in the story.


Wednesday, 22 March 2017
Update on Character Model
I have modelled clothes for the character. This was achieved by using the shape-merging modelling method. Each clothing started out as a standard default shape and then was merged into clothing using the image reference. This was first done with simple shapes, making it as basic as possible and using as little vertices as much as I could until the shape formed correctly. When I was happy with the result, I used the Insert Edge Loop tool to add more vertices, which made the clothing a lot smoother, more round and more fabric. It got rid of any bends in the clothing that appeared very unnatural.


Monday, 20 March 2017
Sound for Animation
Many acclaimed animations almost always have sound. It keeps the beat and satisfies the ears of the audience as well as the eyes. So I was thinking I could perhaps add some classical music to the animation because not only will it be lenient with copyright issues but I feel as though it will suit my animation.
Here are two examples of classical music I'm considering for this project.
Here are two examples of classical music I'm considering for this project.
Another Animation Test
I have done another animation test. This time, I tried to make the pacing a little more smoother to see if that would suit better. I think the result came out fine but I could still improve it a little. For example, the positioning seems to be all over the place. I will probably need to use the onion skinning to stabilise the origami while it folds.

Animation Test from Jack Vanes on Vimeo.

Animation Test from Jack Vanes on Vimeo.
Sunday, 19 March 2017
Background Test
Sketch
Here is the rough sketch to demonstrate how I want the layout of the background to be. At this point, the quality does not need to be perfect as it would make the project more complicated than it needs to be and the quality is fixable at a later stage.

Spline Vector
I then use Illustrator to go over the lines using the pen tool. It is essential that Illustrator is used for this method as 3D programs can reads the vectors done in Illustrator and they can convert them to editable splines. This method speeds up the process, as apposed to making the splines in the 3D software itself.

Splines
After importing the Illustrator file into 3DS Max, the splines are now fully functional and interactive in the 3D software. I can extrude the splines to bring them out as shown in the screenshot below. They now look pretty good so far but they still need some texturing.

Photoshop
Using Photoshop, I created 5 different textures that I will be using for the shapes that I created. The textures are intended to represent materials used for art related projects. This will make the objects seem more like cutouts.

Texturing
Using the textures I made in Photoshop, I applied them to the objects, giving them an art material-like look. I've also added some lighting to cast shadows to give it a more authentic look.

Render
Here is the render of the whole project.

Story Thumbnails
Realistically, I feel as though this storyboard will take up to about one and a half a minute or two minutes in total. I also think that the entire story could be told within 90 seconds since the story certainly is quite short.

Thumbnails
I've done some rough thumbnails for the storyboard, using basic quick sketches as the purpose of this storyboard is to observe the timing and get a concept of the visuals, rather than to present.


Thumbnails
I've done some rough thumbnails for the storyboard, using basic quick sketches as the purpose of this storyboard is to observe the timing and get a concept of the visuals, rather than to present.


Wednesday, 15 March 2017
Post Box
This weeks task is about an animation involving a post box. I've had this idea of someone accidentally putting their beverage into the post box, instead of the letter that they're carrying. I thought this would be a comical way of doing the animation. I developed this idea since this situation has actually happened to me once and also the class discussions made highlights on it when we discussed losing things in post boxes.
Post Box from Jack Vanes on Vimeo.
Here is the video reference. I acted out various pox box scenarios and I chose the ones I liked best. The ones I liked were the ones that I found the most comical.
Video Reference 2 from Jack Vanes on Vimeo.
Post Box from Jack Vanes on Vimeo.
Here is the video reference. I acted out various pox box scenarios and I chose the ones I liked best. The ones I liked were the ones that I found the most comical.
Video Reference 2 from Jack Vanes on Vimeo.
Sunday, 12 March 2017
Lighting Test


Keylighting
After Effects is a useful tool for chroma-keying. I will be using this for integrating the origami animation footage onto a background. I figured to do it this way since it would be easier because it would cut time since the animating part won't come until later.

I cleared out the green screen. However, there is a problem with the shadowing. This red crane origami figure's shadow has a green glow colour to it.

Animation Test
Below is a video of a test I made with origami animation. The animation may seem very fast but that is how I intend to make each origami figure transform from one to another.
Innovative Test One from Jack Vanes on Vimeo.
Here is the same animation but with the keylight effect in action. While the green has completely gone, there is however still a problem as there is still visible parts of the screen left.
Innovative Test Two from Jack Vanes on Vimeo.
To fix the problem with the screen, I've made some adjustments to the settings of the keylight. Now there is no visible evidence of a greenscreen at all on this animation. I'm glad with how this turned out. However, I could always find room for improvement around the edges of the origami figure.
Innovative Test Three from Jack Vanes on Vimeo.
Thursday, 9 March 2017
I find it really intriguing how these scripts differ in formats depending on the movie genre, the method of filming and the production. There is no one way of making a script and there are no strict rules that apply to it.
Here is an example: http://www.lc.ncu.edu.tw/learneng/script/TaxiDriver.pdf
This script describes the characters in detail informing us on their backstory, age, appearance etc... This indicates that the screenwriter intended to get the appearance perfect in the character. The script also mentions the sound effects that occur in the film. I'm unsure why this is but I imagine it's to give the cast and crew a better understanding of how they should present the movie to the audience.
(Source: http://flavorwire.com/441918/10-famous-film-scripts-and-what-you-can-learn-from-them)
Here is an interesting video of a man explaining the important of screenplay.
Here is a few images I found of Memphis. This will be where the story is set. I have chosen this location as it is a popular city in Mississippi as well as it's close to the Bayou.
Wednesday, 8 March 2017
Lip sync
I used a WAV file from the 11 second club to animate a lip sync with Max. I acted parts and decided which five I liked best and put them together. Had a problem with sound as I didn't have any sound device available at the time to play the audio. So I acted out based on the words and decided to focus on the action and didn't worry too much on the lip sync. I decided to use the chair one as I thought it was sinister like the voice and speech implies.
Lip sync
Max Lip Sync from Jack Vanes on Vimeo.
Video Reference
Video Reference from Jack Vanes on Vimeo.
Lip sync
Max Lip Sync from Jack Vanes on Vimeo.
Video Reference
Video Reference from Jack Vanes on Vimeo.
Sunday, 5 March 2017
Origami Storyboard/Thumbnails
I decided to use 8 different animals. I chose the ones that have completely different habitats, so the backgrounds didn't remain similar on each scene.


Lighting test
I booked a canon camera, 4 lamp lights and a tripod so that I could experiment with the lighting. It will replicate the quality of the final quality of the origami animation done in front of a greenscreen.


Dark

One light (Dimmed)

Two Lights (Semi-dimmed)

Three Lights (Full beam)


Dark

One light (Dimmed)

Two Lights (Semi-dimmed)

Three Lights (Full beam)

Scott Mccloud
Scott Mccloud is an American cartoonist. He made a comicbook about understanding comics. In particular, chapter 6 explains how pictures and words collide together. I thought this was an interesting method of giving perspective on how anything is observed and how they work when correlated. In addition, it made me realize how art has come a long way.
Thursday, 2 March 2017
Creative Matrix
Genre
The genre of my story is intended to be what seems like a normal story with a twist ending intended to make the audience feel uneasy. The story takes place in Mississippi. The reason for this is because Mississippi is close to the largest bayou. I wanted to make the characters feel very confined in the story as I thought it would make the characters feel very confined, making it seem a bit creepier.
Place and time
The story takes place in the 1980s and during November. I chose these particular times as November immediately follows the celebration of Halloween. Since Halloween is a symbol of frightful and scary events, I thought adding this month would be quite a good idea. The reason it is set in the 1980s is due to the lack of technology that was available back then. I thought that the lack of technology and the resources available would make an impact on the story's frightfulness to the audience.
Culture
Both Adrian and Kevin are Caucasian Americans. Adrian speaks in normal English with a slight accent, while his cousin speaks in a hill billy-like accent with broken English. This is because Adrian had a good education due to his wealth whereas Kevin couldn't afford a decent education. This is due to the fact that they were both born in different parts Mississippi.
Environment
In the USA, the bayou is full of alligators. Alligators are only found in the USA and China whilst crocodiles are found all over the world. This also takes place during the time of November, so the environment could still be filled with autumn leaves and the weather beginning to become cold.
Interior


Mississippi steamboat
This steamboat is symbolic in Mississippi. It may be displayed on shop windows or pictures of it is sold to the public.

The genre of my story is intended to be what seems like a normal story with a twist ending intended to make the audience feel uneasy. The story takes place in Mississippi. The reason for this is because Mississippi is close to the largest bayou. I wanted to make the characters feel very confined in the story as I thought it would make the characters feel very confined, making it seem a bit creepier.
Place and time
The story takes place in the 1980s and during November. I chose these particular times as November immediately follows the celebration of Halloween. Since Halloween is a symbol of frightful and scary events, I thought adding this month would be quite a good idea. The reason it is set in the 1980s is due to the lack of technology that was available back then. I thought that the lack of technology and the resources available would make an impact on the story's frightfulness to the audience.
Culture
Both Adrian and Kevin are Caucasian Americans. Adrian speaks in normal English with a slight accent, while his cousin speaks in a hill billy-like accent with broken English. This is because Adrian had a good education due to his wealth whereas Kevin couldn't afford a decent education. This is due to the fact that they were both born in different parts Mississippi.
Environment
In the USA, the bayou is full of alligators. Alligators are only found in the USA and China whilst crocodiles are found all over the world. This also takes place during the time of November, so the environment could still be filled with autumn leaves and the weather beginning to become cold.
Interior
Mississippi steamboat
This steamboat is symbolic in Mississippi. It may be displayed on shop windows or pictures of it is sold to the public.
Wednesday, 1 March 2017
Character model progress
I restarted the model since the other one was not very good and didn't seem to work. This book, Character Modeling with Maya and Zbrush by Jason Patnode has some points on how to create 3D character models for video games. The idea of the character being intended for video games implies that the character must be able to be manipulated. I will explore the book and see if it can assist in my character modelling.
Torso

(Source: Chapter 3, page 49)
Before I began on the torso, I made sure to add a mirror so that I only needed to do one half and then the project will reflect in real-time as I work. The torso is the first thing I started out with as it is in the centre and connected to every single body part. I shaped it to fit the reference images.


Legs

(Source: Chapter 3, page 53)
Next I extruded the bottom half of the torso to create the legs. I made sure to keep the polygons apart so that they don't get caught in the mirror.

Arms/Hands

|(Source: Chapter 3, page 61)
I extruded the arms out and scaled them down as I went along as arms on the human body tend to do that. The arms were quite easy but the hands were quite difficult. I had to create 8 separate faces to determine the fingers. They were hard to keep in tact.

Eyes/Head

(Source: Chapter 3, page 173)
For the head, I essentially just extruded the neck part and went all ways, making a cube shape and then I played around so that they matched the reference images. The eyes were quite difficult as I needed a heptagon-like shape. I had to find the specific faces I needed to create them. And the faces on the head didn't come near the reference and it seemed weird. So I just edited the mesh to make the polygons out of the way and then added another cut to make the eye shapes.


Torso

(Source: Chapter 3, page 49)
Before I began on the torso, I made sure to add a mirror so that I only needed to do one half and then the project will reflect in real-time as I work. The torso is the first thing I started out with as it is in the centre and connected to every single body part. I shaped it to fit the reference images.


Legs

(Source: Chapter 3, page 53)
Next I extruded the bottom half of the torso to create the legs. I made sure to keep the polygons apart so that they don't get caught in the mirror.

Arms/Hands


|(Source: Chapter 3, page 61)
I extruded the arms out and scaled them down as I went along as arms on the human body tend to do that. The arms were quite easy but the hands were quite difficult. I had to create 8 separate faces to determine the fingers. They were hard to keep in tact.


Eyes/Head

(Source: Chapter 3, page 173)
For the head, I essentially just extruded the neck part and went all ways, making a cube shape and then I played around so that they matched the reference images. The eyes were quite difficult as I needed a heptagon-like shape. I had to find the specific faces I needed to create them. And the faces on the head didn't come near the reference and it seemed weird. So I just edited the mesh to make the polygons out of the way and then added another cut to make the eye shapes.


Subscribe to:
Comments (Atom)