Tuesday, 27 December 2016
Final project process
Dynamic simulation
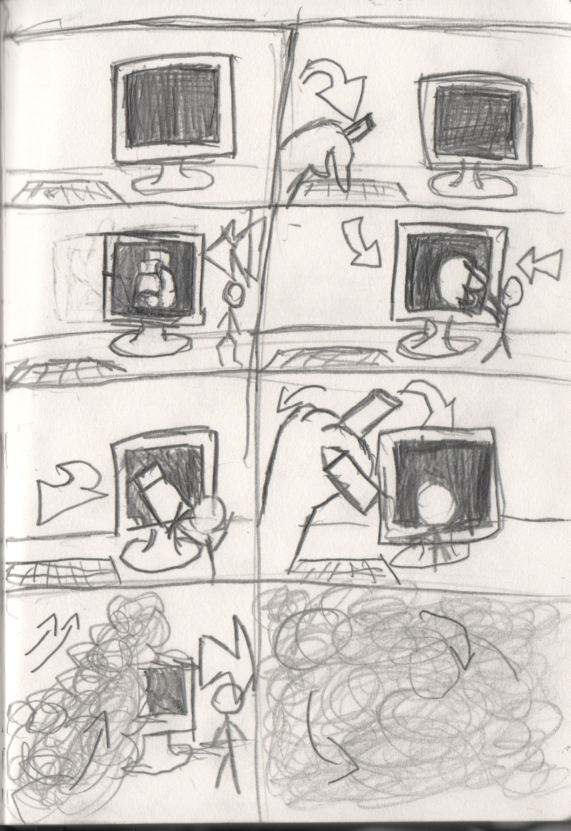
I used this smoke video and integrated it into the composition.
I added dynamic smoke into the end of the sequence. I've also added some colour correction because the capacity level made the smoke too clear.

Applying Animated elements to footage
I rendered out the current composition and imported the video into 3DS Max so that I could animate the lighter according to the hand. I used key-framing animation and went through every frame to make sure that the lighter fitted well into the rotoscoped hand.
I've also added a mental ray material so that the lighter appears more realistic.

Rotoscoping

Tracking
I tracked the hand from the original footage. I decided to use the stripes from the jacket sleeve as a track point since I thought it was the most distinctive. I tracked the hand coming off the screen and applied the tracking motion to a still image of the lighter, so that the hand appears to be picking up the lighter.

Animated mask
I created an animated mask to cut out the hands of the original footage. This needed to be done so that the hand appeared as if it was part of the still image I put as a background in the animation. I made a different mask for each section of the hand. This way it would be easier to manipulate.


Chroma-keying
A few changes have been made from the planned project. I decided to use stock footage in terms of chroma-keying.
I used this stock footage of a female pointing out with a stick. I chroma-keyed the female into the computer screen so that she appears to be directing the rotoscoped hand to coming out of the screen and placing the lighter on the desk.

I used this smoke video and integrated it into the composition.
I added dynamic smoke into the end of the sequence. I've also added some colour correction because the capacity level made the smoke too clear.

I rendered out the current composition and imported the video into 3DS Max so that I could animate the lighter according to the hand. I used key-framing animation and went through every frame to make sure that the lighter fitted well into the rotoscoped hand.
I've also added a mental ray material so that the lighter appears more realistic.

Rotoscoping

Tracking
I tracked the hand from the original footage. I decided to use the stripes from the jacket sleeve as a track point since I thought it was the most distinctive. I tracked the hand coming off the screen and applied the tracking motion to a still image of the lighter, so that the hand appears to be picking up the lighter.

Animated mask
I created an animated mask to cut out the hands of the original footage. This needed to be done so that the hand appeared as if it was part of the still image I put as a background in the animation. I made a different mask for each section of the hand. This way it would be easier to manipulate.


Chroma-keying
A few changes have been made from the planned project. I decided to use stock footage in terms of chroma-keying.
I used this stock footage of a female pointing out with a stick. I chroma-keyed the female into the computer screen so that she appears to be directing the rotoscoped hand to coming out of the screen and placing the lighter on the desk.

Monday, 26 December 2016
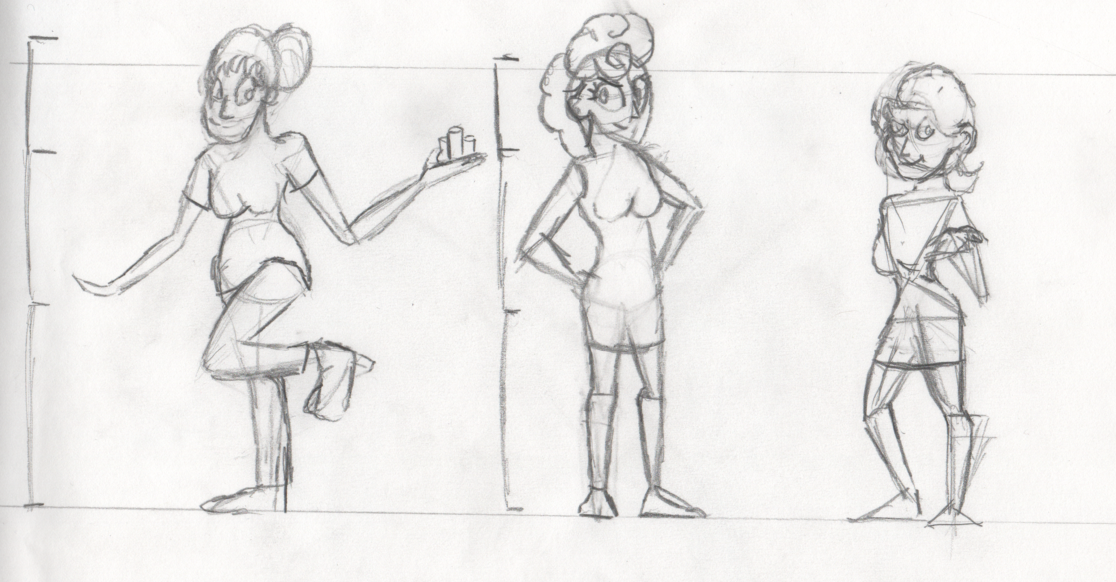
Character Turn around Sheet/Model Sheet
Turn around sheets are mainly used so that animators can get an idea of what the character looks like from every angle. I decided to use 90 degree angles for this character as the 3 quarter perspective can easily be inferred based on the character's design.
This sheet has the fundamental appearance, pose and proportion of the character.


This sheet has the fundamental appearance, pose and proportion of the character.

Character Emotions


Thursday, 15 December 2016
Lighter
I've used 3DS Max to model a 3D lighter using photographic reference. I will use it in my project because it will be easy to manipulate and get any specific angle that I want if needed.


I imported the 3D model into Photoshop so that it can be put into After Effects. This is because After Effects doesn't read any files that 3DS Max can export.
I've also lost some of the texturing to the lighter but it's only a trivial issue since it still fits its original design idea.

Monday, 12 December 2016
Second Character Animation
Here is William in his apartment with the puppet on the table. This is the part where the narration will fit in. I used a song about depression and the apartment is dark to fit William's personality.
Second Character Animation from Jack Vanes on Vimeo.
Second Character Animation from Jack Vanes on Vimeo.
Sunday, 11 December 2016
Osbert Parker
Osbert Parker uses cutouts of stock footage, usually from neo-noir films and integrates them to stop motion. His work is very playful and he has received a lot of rewards for it.
In this project, we decided to use cutouts on a real model car to simulate Osbert's work with the chase scene in one of his movies.
Similar to Osbert, we used cut outs of footage and applied them to the scene.
I did the cutouts with the two men walking at the beginning. If I had more time, I would've been more precise with the cutouts but unfortunately, time was of the essence and there were too many cutouts.
Group Project from Jack Vanes on Vimeo.
Thursday, 8 December 2016
Progress
I recorded a video using a Canon DSLR camera to obtain top quality footage. The video includes me holding a cigarette pressing down on a key and then acting as if grabbing the lighter, so I would be acting the parts for the project. However I made a mistake while recording this video and didn't realise until afterwards. The lower right area is surrounded by wire and could be a problem with the chroma-keyed person appearing there.
To avoid re-recording, I took a picture of a desk that lacks any visible wires in the lower right area, then I put it into After Effects. I masked out the monitor and keyboard from the original footage and applied them to the photo to make it appear as if the monitor and keyboard is actually on the image. There was also a wire overlapping the monitor which could not be masked out. So I used the spot healing tool in Photoshop to make the wire disappear from the screen.

Rotoscoping
In addition, I've recorded my hand which appears to be coming out of the screen, holding an object (which will be the lighter) and then giving it to the character before disappearing back into the screen.
I took note of the lighting and shadows in the room and did my best to match it up with the shadows on the rotoscoped hand.
Rotoscope from Jack Vanes on Vimeo.
Sunday, 4 December 2016
Character environment concept
I was thinking that William could live in a dark run down apartment to replicate his depression. I think the environment works in two ways since darkness also indicates evil, so it also shows the evilness of his manipulative puppet.

Saturday, 3 December 2016
Motion capture
For this project, we worked in a group to put together a motion capture animation. We chose to do a dance movement as it was something that we thought would work well.
Here is the tutorial I used for mapping out the motion points and applying them to a character for motion builder.

Here is my test on motion capture. The legs were extremely buggy.
Motion Capture test from Jack Vanes on Vimeo.
Here is the final video.
Motion Capture from Jack Vanes on Vimeo.
Here is the tutorial I used for mapping out the motion points and applying them to a character for motion builder.

Here is my test on motion capture. The legs were extremely buggy.
Motion Capture test from Jack Vanes on Vimeo.
Here is the final video.
Motion Capture from Jack Vanes on Vimeo.
Thursday, 1 December 2016
Project idea
This project involves a hand with a cigar pressing a keyboard. Then a rotoscoped hand holding a lighter comes out of the screen and gives a chroma-keyed person a lighter. The chroma-keyed person then walks and gives the lighter to the computer user, who takes it off him. Smoke will then appear on screen to indicate the cigar has been lit.
This project will involve animated mask of the hand and screen, dynamic cigar smoke, chroma-keying, and tracking.
Monday, 28 November 2016
Narration animatic
I was thinking about giving the character some narration so that it not only gives him more presence but it also further reveals the character's personality more. This particular scene exposes William's innocence and that he's being manipulated by the puppet (Robert).
The dialogue for this scene is "When I was a young man, I've always wanted to make people entertained and to earn a living from it. But this isn't the way I wanted it."
New Animatic from Jack Vanes on Vimeo.
The dialogue for this scene is "When I was a young man, I've always wanted to make people entertained and to earn a living from it. But this isn't the way I wanted it."
New Animatic from Jack Vanes on Vimeo.
Sunday, 27 November 2016
Caroline Leaf
Caroline Leaf animated using sand. She's often nominated for an Oscar and she's known for "Owl who married a goose" made in 1974.
Since Christmas is coming up, we decided to use a lyric based on a Christmas song: "When the snowman brings the snow. Well, he just might like to know."
We used salt as we thought it would make great to use as it replicates the colour of snow.
I found this process to be quite complex as the salt is hard to manipulate. However it is a rather unique way of doing the project.

Here is the final project.
Snowman (2) from Jack Vanes on Vimeo.
Thursday, 24 November 2016
Storyboard ideas
Idea one
I was thinking about a hand coming on screen with a lighter. with buildings in the background When the lighter is lit, the hand comes down and the flames cover the screen. Afterwards, the buildings are now all on fire. I was thinking of masking out the buildings, so that I can make the sky turn from night to day in an instant. A snowy or rainy weather could be suitable so that the fire on the buildings go out.


I was thinking about a hand coming on screen with a lighter. with buildings in the background When the lighter is lit, the hand comes down and the flames cover the screen. Afterwards, the buildings are now all on fire. I was thinking of masking out the buildings, so that I can make the sky turn from night to day in an instant. A snowy or rainy weather could be suitable so that the fire on the buildings go out.

I was
thinking of a hand coming on screen to light a candle. The candle then explodes, creating matter. A giant bird, which I will mask out, appears on the screen of fields. The background could then change rapidly.

Here's another idea I had. This involves an animated stickman escaping a dynamic paper on fire in front of a green screen.
Final task: Personal Project Research
I have picked up a book called After Effects Most Wanted by Christian Darkin, Chris James Hewitt, Joost Korngold, Peter Reynolds, Mark Towse and Simon Tyszko. This book is about visual effect artists who are well known for their fine visuals, especially in After Effects. This might provide me with some inspiration for my project as well as knowing new methods of After Effects.
Peter Reynolds
Reynolds started his career in fine arts. He started in Animation and motion graphics. He also worked with traditional art techniques and even some digital based art, which was the time he realized that working on visuals was what he wanted. (Page 6).
Reynolds presents a project which he did for a commercial. It involves combining 2D and 3D elements. He made a spinning dollar coin change into a spinning cap to reveal it is a coca-cola bottle top. While this idea is good for other uses, I don't think this could be useful for my projects.

Mark Towse
Towse is the founder and manager of Bigimpact TV ltd, founded in April 2000. He usually writes for magazines and is one of the UK's top After Effects specialists. He's made many tutorials and articles related to After Effects and DV. (Page 20).
Towse presents a project with a heap of creativity and freedom. He used footage of snowboarders and masked them out and also added some soundtrack. Masking is a good part of visual effects and will probably be used for my project.

Simon Tyszko
Tyszko is a fine artist, filmmaker and photographer. He works mostly at gallery-based artist, in a various rage of media, including neon, video, film, books, glass, fabrics ad assembled objects. He's won a number of rewards for various works including two catagories in the London Photographic awards in 1998. (Page 48).
Tyszko is responsible for creating a dynamic split screen using two different stock footage of cars. This effect is interesting though it seems to not pertain to my project ideas.

Chris James Hewitt
When Hewitt was younger, he found his love for creativity when he started to experiment with the likes of Photoshop. He received a design diploma at Oldham technical college before he was recruited by top northern based design agency Computer Love. (Page 82).
Hewitt uses After Effects' 3D elements to create a high use of detail in light rays. This idea is good and would be nice if I created it for my project so I might take this into consideration.

Christian Darkin
Darkin is a writer, animator and film maker. Darkin made a project in which he created a 3D fish in 3DS Max and then super imposed it onto real footage of the sea to give an impression of the fish actually appearing in the sea. This is the one I found very inspiring. I like the idea of adding an animation onto real life footage.
(Page 174).

Adding to footage
This video involves rotoscoping animation. For its time it impressed its audience as it was one of the very few medias to actually be animated using this technique.
The section of the video that I find most notable is the part where the hand comes out of the comic, implicating animation on real life footage. I particularly like the fact that it doesn't lose its rotoscoping technique when exiting the comic. I might take this into consideration when doing my project.
Sunday, 20 November 2016
Oskar Fischinger
Oskar Fischinger was a German animator. He is known for his work on working with excessive colours. He has made an animation which involves stop-motion using a cigarette.
We thought the idea of stop motion and using excessive colours would be a great way to reflect on his work. In my case, I was in charge of the background as I added more paint on it within every frame to make it transform on screen as the cubes move around the stage.
Group Project from Jack Vanes on Vimeo.
Thursday, 17 November 2016
The Martian
The Martian is a movie that is full of visual effects. It usually involves a lot of chroma keying as seen in the Behind the Scenes video, most of the action is done in front of a green screen. The movie also involves a lot of colour correction to replicate the atmosphere of Mars.
What makes this more impressive is that the high amount of detail on minor aspects such as the backgrounds.


The movie made a high impact on the critics as this film was well received. The ratings were very well given and the box office was also a big success.
Tuesday, 15 November 2016
Adding motion blur
Here is a method of adding motion blur highlighted in the training book Adobe After Effects CC 2015 release by Brie Gyncild & Lisa Fridsma (Page 88). This method might be helpful in making the character slide more smoothly across the screen.

Motion Blur from Jack Vanes on Vimeo.
Here is the motion blur used on the skater. This method is not really noticeable and it doesn't add anything new. However, it might help if it was to be used for projects that are at a faster pacing.
Motion Blur from Jack Vanes on Vimeo.
Character Animation
Here is a scene I have animated that reveals my character's personality. I acted this scene out in front of the class and based on the feedback, this scene would be suited for the character. If I had the chance, I probably would've added more dialogue. And probably would've done better character acting.
Character Animation from Jack Vanes on Vimeo.
Character Animation from Jack Vanes on Vimeo.
Sunday, 13 November 2016
Mary Ellen Bute
This weeks work will be based around Mary Ellen Bute. She was known for her moving art, which involved music and colour scores.
For this project, we were put into a group of 4. And each one of us had to do 2 seconds of the soundtrack and then match up later. The soundtrack was the classical Land of Hope and Glory. We decided to use red, white and blue to fit the classical music as it corresponds to the national colours.
I was particularly fond of the video "Spook Sport" in which two triangles dancing around to the classical music playing in the background, which is what I decided to make something similar to that.

Mouth Chart
Here is the mouth chart for my character. This will be needed for the dialogue for the character.


Animatic
Here is the animatic to the animated scene which will
reveal the character's personality.
Character Animatic from Jack Vanes on Vimeo.
Character Animatic from Jack Vanes on Vimeo.
Chroma Keying and Tracking
I am happy with the results.
I thought the chroma keying really worked well meshing into the background. And I thought that the motion tracking method helped with keeping the fire in position with the eyes. Overall, I think this turned out to be excellent. If I could go back, I would have been more precise with the fire in the eyes when she blinks. I also would've played about more with the color correction on the fire as the fire in this video seems a bit too red to me.
Chroma Keying and Tracking from Jack Vanes on Vimeo.
This page from the guide book Adobe After Effects CC 2015 release by Brie Gyncild & Lisa Fridsma (Page 250 and 251) will remind me how the motion tracking method will work in the future and will possibly add further development to it.

Chroma Keying and Tracking from Jack Vanes on Vimeo.
This page from the guide book Adobe After Effects CC 2015 release by Brie Gyncild & Lisa Fridsma (Page 250 and 251) will remind me how the motion tracking method will work in the future and will possibly add further development to it.
Friday, 11 November 2016
Integrating the character.
I have added the skater that I cut out using the mask onto a video of a car moving past. The key was to make the skater jump over the car, which required some tweaking as the skater's transitions as in the original composition, he would not go high enough to get over the car. To make this more intense, I made it so that the skater is just about on the edge of the car, giving the impression that the car was just about missed.
I've also added a motion blur. This was because I was not happy with the fact that the skater was completely solid, whilst the car had a motion blur as it made it seem not correctly synced. In addition I've added a 3D shadow for the first part of the skater. I had to cut out the shadow towards the end and use the transform sub-layer tool to manually animate the end shadow because when the skater landed, the shadow was not within his depth. It made it appear as if the skater was floating in the air.
Overall, the video turned out well. If I could go back, I would have made more progress with the shadow and maybe looked more into the motion blur to make it seem more like the motion blur of the car. Also, I think the shadow may have effected the car in some way, which is what I would have also made a change to.
Jumping Car from Jack Vanes on Vimeo.
Creating the shadow required creating a 3D light, after creating a 3D camera. Then a shape layer is made so that the shadows have something to cast on. Of course, the light needs to be hidden or else it will interfere with the character.
Here is the method I used to cast 3D shadows on the character from the book Adobe After Effects CC 2015 release by Brie Gyncild & Lisa Fridsma (Page 270).
Sunday, 6 November 2016
Skater
This task was extremely time consuming and a tedious process. However, the end results were worth it. There are a few bits outstanding on the skater but overall, it turned out better than I anticipated. This was achieved by adding a mask. But not just one mask, 13 masks. Two for the feet, six for the limbs, two for the hands, one for the head, one for the abdomen, and one for the skateboard. The reason they were split up in masking is because this way, they would be easier to manipulate capturing as much of the character's content as possible. Luckily this didn't need to be done for every frame. I used the transition tool in the sub-layer to create a motion flow silhouette around the skater.

This is the result of all the masking done with a pitch black background. I'm glad with how it turned out. Though I could've done better with the hands and maybe taken away some of the character's interference as in some areas, the background is conspicuous.
Jump from Jack Vanes on Vimeo.

This is the result of all the masking done with a pitch black background. I'm glad with how it turned out. Though I could've done better with the hands and maybe taken away some of the character's interference as in some areas, the background is conspicuous.
Jump from Jack Vanes on Vimeo.
Saturday, 5 November 2016
Jan Svankmajer
Jan's Svankmajer's work was based on stopmotion. His animations are usually grotesque and give the audience a creepy feeling. An example would be Jildo. A semi-stop motion film in which human parts are being eaten. We based our idea on this to make it have an even more creepier feeling, displaying human parts as ordinary food.
Food Project from Jack Vanes on Vimeo.
Thursday, 3 November 2016
JellyFish Pictures Occupation Positions and Roles
These are the job positions in visual effects that I personally find interesting.
Runner
The runner is the starting point in the company. They provide backup and support for the VFX company, usually providing support in the editing department and production office. A person with no experience in the industry would be suited for this occupation to build their way up to gain experience before further going into a higher ranking position.
Animation lead
The Animation Lead is in charge of all the process of creating the visual effect animations that are involved. As well as running the schedule for the animation, they can also participate in it.
Artist
This is pretty straight forward. The visual effects artists create the special effects and clean them up to a suitable standard. Artists are very important as they are the key to creating the visuals that the audience will see on the screen.
Producer
A producer for a visual effects company oversee the schedule and monitor the budget. They are responsible for the reassurance that the artists and the supervisor make the projects in a good timing and quality. The job is very stressful and challenging but it can be quite beneficial in terms of wages.
Co-ordinator
The timing is essential part of the visual effects company. The co-ordinator works in similar ways to the producer and works directly under the supervisor and keeps all the workflow organized and running smoothly. This way, the production will not fall behind schedule.
Supervisor
The visual effects supervisor makes all the creative decisions and works with the director to make sure they get the visual effects that they want.
Creative Director
The creative direction are responsible for directing and supervising the technical stages of visual effects to make the product quality what it needs to be.
Source: http://jellyfishpictures.co.uk/people/
Saturday, 29 October 2016

My Three Chosen Artists
These are Artists I have chosen whose style which I believe will suit my character the most.
Sam Kelda
Sam is an Illustrator who likes cats. He was born in South Dakota, got a BFA in painting and currently works at a bakery.
I like chose him because his work seems like the type of work that would be suitable for animation. I also believe that the simplistic style he has would add depth to my magician character.
http://www.samkalda.com/blog
Stephan Schmitz
Stephan is an award winning illustrator in Switzerland.
The reason I have chosen him is because although his style is rather basic, they do have hidden meanings which say a lot. It proves that art doesn't need to be detailed to be eye capturing and that less can be more. Therefore I think it would suit my character.
http://www.stephan-schmitz.ch/index.php?/project/illustration/
Richardo Bessa
Richardo is an artist who was born in Portugal and is currently located in London, UK.
The reason I have chosen his style is because I wanted one style that added detail to experiment with my character. I think this type of style would suit my character because there's a lot of dark colours usually involved, which suits the theme.
http://ricardobessa.com/
Week 5 Project
I'm happy with how this project turned out.
Innovate Animation - Week 5 Animation from Jack Vanes on Vimeo.
Innovate Animation - Week 5 Animation from Jack Vanes on Vimeo.
Thursday, 27 October 2016
Final Dynamic project
Dynamic Project 2 from Jack Vanes on Vimeo.
To update this project I've used a mask to cut out the foreground buildings and used a video of flying birds in the background. This was to make it appear as if the video was not a still image as in the original video, snow was the only thing that was moving in the video. Not even the trees were being moved by the wind, thus made it appear static. That is the reason I added the flock of birds video.
Brightness and contrast
To make the foreground buildings stand out more, I also cut them out using the mask method. I used brightness and contrast to make them appear lighter than the building behind to give a better slight of realism to the effect.
Wednesday, 26 October 2016
Yuri Norstein
This week's project will be based on Yuri Norstein's work. He has created a 1975 film called The Hedgehog and the frog. His style was made in a similar way to the silhouette animation. He used stop motion with figures. The difference is he painted on his backgrounds and characters and coloured them in as they will be seen on camera with the lights towards the models rather than underneath them.
For my part of this project, I was required to create a stop motion puppet bird which can be manipulated for movement for the animation purposes.


Here was the process of the animation we were doing.


Snow tutorial
This tutorial looks like it might help with the snow effect on my project video to give some method of snow for the background. It uses a similar method of particles only that it uses snow.
In the end I decided not to use this because it didn't add anything new to the composition. Though I think this video is worth mentioning as it could help in future projects. After Effects Video Tutorial: Creating Realistic Snow from PremiumBeat.com on Vimeo.
In the end I decided not to use this because it didn't add anything new to the composition. Though I think this video is worth mentioning as it could help in future projects. After Effects Video Tutorial: Creating Realistic Snow from PremiumBeat.com on Vimeo.
Monday, 24 October 2016
JellyFish Pictures
JellyFish Pictures is a visual effects and animation company based in London. It has over 100 artists employed at the offices. Their work is spread into services of advertising, television and film industries. They are known for their recent VFX work on the movie "Kingsman: The Secret Service." It has been in production for 14 years, expanding their animation and graphic work for multiple media industries. It has received awards for its outstanding visual effects.

Sources: http://jellyfishpictures.co.uk/
https://www.linkedin.com/company/jellyfish-pictures

Sources: http://jellyfishpictures.co.uk/
https://www.linkedin.com/company/jellyfish-pictures
William The Magician
I have added further development to William's character. I have also decided to change the story a bit based on peer feedback on my character presentation.


Thursday, 20 October 2016
Manual Cinema Project
This project will focus on live preforming stories using silhouettes and cutouts. Since Halloween is coming up, the project will be based on that.
In our group, I have created the backgrounds that will be used for our project. I used black card and a a pencil to mark out silhouettes before using a crafting knife to cut them out..


In our group, I have created the backgrounds that will be used for our project. I used black card and a a pencil to mark out silhouettes before using a crafting knife to cut them out..


Dynamic Project
This second task project is based around adding dynamic fire to a video.
In this instance, I used a video of a building. It was quite hard finding a video that doesn't have the camera move because that would've made the project a lot more difficult than it needed to be.
I also added some blaze and some smoke to make the fire appear like it's actually there.
Dynamic Project from Jack Vanes on Vimeo.
Here is a link to the video I used for this dynamic project.
https://pixabay.com/en/videos/snow-city-cloud-cold-ice-gel-2443/
This was a one minutes video of a stationary camera focused on buildings which have heavy snow. I expanded the footage by putting in fire that I used for the test project, using the same method. I've also added in some extra flames around the mass fire to make it appear more settling.
Haze
I've also added haze to the fire in this video but it is very difficult to see as the white sky background is blatantly solid.
Adding haze can be achieved by first inserting a new solid layer. Then going to effects > simulation > particle background. Using the parameters, click the canon. Changing the barrel to 152, the particles per sec to 73, the velocity to 34 and the particle radius to the default (3) will make a wider spread of particles.
Here is a test of heat haze which can be seen more clearly.
Fire Haze from Jack Vanes on Vimeo.
Particles
The video below was made using particle simulation as well. The difference is that a leaf was used to replace the red dots that usually appear. This method could be used for a lot of things that fall from the sky such as snow, rain, hail etc...
Particules from Jack Vanes on Vimeo.
Sunday, 16 October 2016
Two Character Concepts
For the two characters, I have created multiple visual concepts. I have experimented in ideas using three shapes, triangles, squares and circles. I mainly used triangles for Lucky Lucy since female bodies are quite curvy and tend to use a lot of triangles. I had a play around with the techniques and exaggerated on the characters' proportions to give it a cartoony look.
Lucky Lucy


William The Magician


Lucky Lucy


William The Magician


Subscribe to:
Posts (Atom)